
w
wayne preston
4 years ago
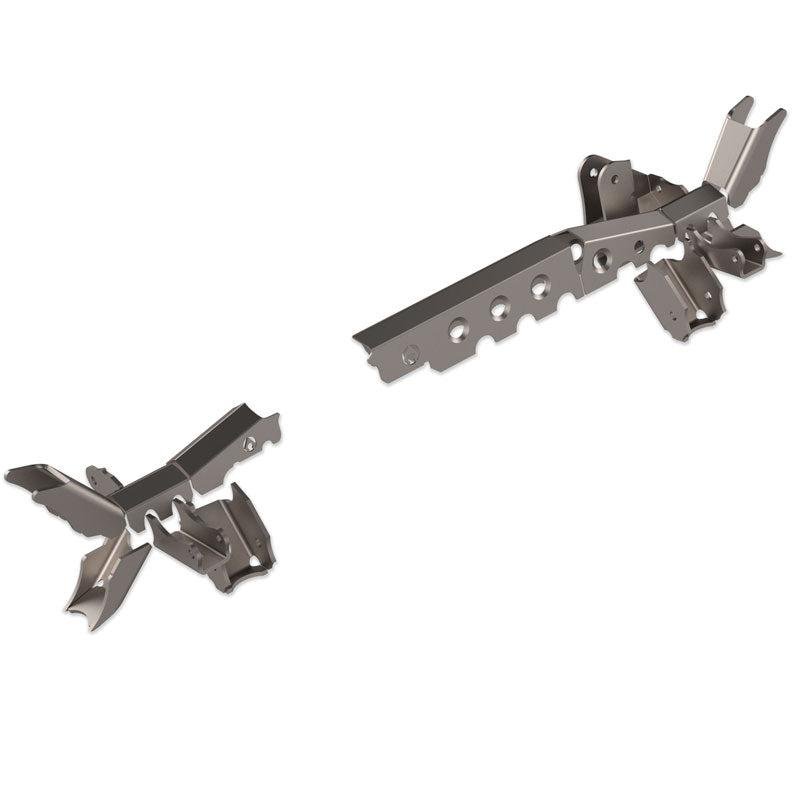
While we're working on the detailed instructions, here's some tips on installing your APEX truss. Refer to online pictures for orientation of the truss.
STEP 1. Unpack contents of shipment. Remove axle from vehicle for best results and easiest installation. Prior to mockup make sure axle is clean and uninstall any oem and aftermarket bolt-on accessories that may conflict with truss installation. Remove axle breather hose and uninstall any electric locker wires from casting. This area will be welded so care should be taken to prevent these components for melting.
STEP 2. Place parts 1 and 3 on the axle around the pumpkin. These parts should drop right on and self-center. Part 2 requires a little more work. If you are keeping your factory trackbar bracket, you will need to remove some material from part 2. Using a cutoff wheel, cut along the laser etched lines which make a trapezoid shape. If you are using a replacement Artec trackbar bracket, no cutting of the truss is needed. Place the tip of the truss that contacts the coil bucket on the coil bucket and rotate the truss down sliding past the UCA bushing. It may require a little force to pop past the bushing. Part 4 goes under the passenger side coil bucket. If you are keeping the factory trackbar bracket, you'll need to trim this bracket on the etch lines as well. Once trimmed, the truss piece will slide in from the backside over the shock brackets...it may take some work to shimmy it in there. If removing the factory trackbar bracket and using an Artec trackbar bracket, this piece can easy slide in from the front. Part 5 slides in from the front under the driver side coil bucket.
STEP 3. Using a marker or paint pen, indicate the areas on the axle where the truss touches the axle to prepare for welding. Remove truss pieces from axle. Using an angle grinder with either a flapper disc or wire wheel brush, clean the surface of the axle tube, casting, upper control arm mount, and coil perch until bare steel is exposed. Clean surfaces on drivers side casting, tube, and coil perch in a similar fashion. Repeat step 2 and place all truss pieces back on axle.
STEP 4. Prior to welding, ensure that the bottoms of all the truss pieces are in a straight line all together. The long truss can sag a little near the UCA mount so push down on the part over the casting and it'll straighten out. Place tack weld on truss pieces to hold all in place. Double check all truss pieces are straight.
STEP 5. Begin welding small strips of truss that touch the axle tube. You want to move around to different parts of the axle as you weld so you don't heat up areas too much. Place a welding blanket over welds so they do not cool too quickly.
STEP 6. To weld truss to cast section with best results, preheat casting evenly around where truss contacts to approximately 400 degrees. DO NOT HEAT UNTIL GLOWING RED AS THIS MAY DAMAGE THE CASTING. Once preheated, weld truss to casting before it cools. For best results, use a needle scaler or peening hammer to relieve the weld directly after welding. Post heat the area to approximately the same temp you used to preheat. Wrap axle in a welding blanket to slow the cooling process, the cooling should be slow (18-24hrs.) and uniform. (The idea behind this method is to relieve the stresses in the materials prior to welding, and ensure that the plate steel does not cool quicker than the cast resulting in stress cracks.)
STEP 7. When completely cooled, check for any cracks in weld especially around the casting. If cracks are discovered repeat the necessary steps above, grinding out any cracked welds and prepping the area.
STEP 8. Once axle is ready, paint truss and axle where bare steel is exposed to prevent rusting. After paint is dry, reinstall axle breather hose, electric locker wire, and any other components. Install axle according to manufacturers specs.
Full Instructions Coming Soon

Click image above to view Installation Instructions
Install videos are coming soon.
Received a beat up box (thanks UPS) thankfully Artec boxed it well and the individual parts were all in individual boxes and therefore had no damage or missing pieces. Everything is formed well with crisp angles and a nice fit.
4.83 average
1,334 reviews
Artec Industries Jeep Giveaway Sweepstakes Abbreviated Rules
NO PURCHASE IS NECESSARY TO ENTER OR WIN. FULL NAME, PHONE NUMBER, EMAIL, AND ADDRESS ARE REQUIRED. GIVEAWAY NOT VALID IN RHODE ISLAND OR MINNESOTA.
Artec Industries Jeep Giveaway is open to U.S residents 18+ (or legal age in their state), excluding Rhode Island and Minnesota. Any Sponsor, Administrator, and their families excluded. No purchase is necessary.
Entries must include your name, phone number, and email and are limited to 500,000 entries per person.
Entry options: purchase of eligible products on dev.artecindustries.com, verified email opt-in, or AMOE on dev.artecindustries.com. Incomplete, late, or ineligible entries are void. Ten finalists will be randomly selected, from which one grand prize winner will be drawn. The grand prize is a 2024 4XE Rubicon (or cash alternative of $17,000). Winners must respond within 10 days and may be required to complete eligibility paperwork. Prizes are non-transferable and winners are responsible for taxes. By entering, you accept the rules and consent to release and publicity terms. Full rules and privacy policy are at /pages/promotion-terms-and-condition